How to Start Hp All in One Pc
Z7_3054ICK0KGTE30AQO5O3KA30N0
hp-concentra-wrapper-portlet
![]() Actions
Actions
HP Slate 21 All-in-One PCs - Setting Up Your HP Desktop Computer (Android 4.2/Jelly Bean)
This document applies to HP desktop computers with Android 4.2/Jelly Bean operating system.
This document provides information about setting up your HP Android computer, setting up the Internet connection, and adding an owner account.
Included in the box
The following items ship with the product:
-
Keyboard and mouse (select models only)
-
The All-in-One computer
-
Webcam
-
Internal microphone
-
Webcam light
-
Volume up button
-
Volume down button
-
Brightness up button
-
Brightness down button
-
Power button
-
Speakers

-
SD card reader
-
USB 2.0 connector
-
Audio out (headphone) jack
-
AC power connector
-
Ethernet connector
-
USB 2.0 connector
-
USB 2.0 connector

-
-
AC adapter and power cord
Step 1: Setting up the hardware
Use the steps in this section to set up your computer.
Unpack the box and remove any packaging material from the computer and power cables.
Set the computer on a desktop or mount it to a mounting fixture such as a wall mount or swing arm. Place the computer in a convenient, well-ventilated location. To assemble the computer for desktop use:
caution:The power cord must be disconnected before setting up the computer.
-
Set the computer face down on a flat surface protected with soft material such as a towel.
-
Pull the stand outward until you hear it click.

-
Lift the computer to an upright position and place on a flat, stable surface.
-
Face the rear of the computer and hold it carefully. Without touching the screen, adjust the screen tilt by rotating the stand up and down.

-
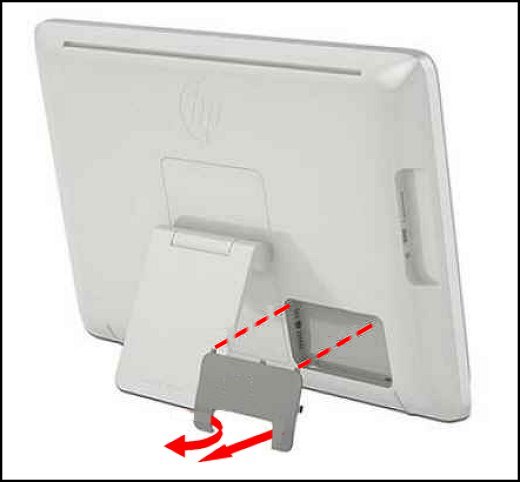
Remove the Rear I/O cover by gently pulling on the lower corners of the cover.
-
Connect the AC adapter and power cable to the computer.
-
Connect the AC adapter and power cable to a power outlet.
-
Remove the protective film from the computer screen.
Step 2: Turning on your computer
The power button is located on the lower right edge of the computer display. To turn on the computer, press and hold the power button until the HP logo appears on the screen. After turning on the computer, a Welcome screen displays. Using the touch screen and on-screen keyboard, continue with the steps in this document to complete the setup process.
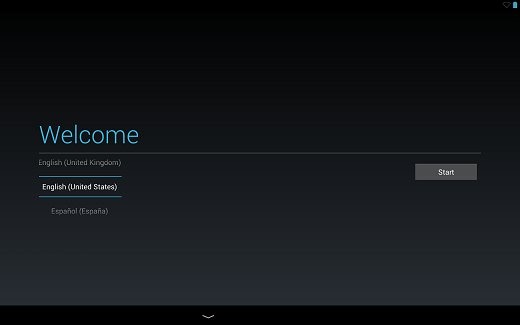
Step 3: Selecting your preferred language
Select your preferred language on the welcome screen.
-
Swipe up or down on the touch screen to scroll through the language menu until your preferred language is highlighted.
note:
If your preferred language does not appear in the list, you can install the language after completing setup. Search for the language in the Google Play Store (in English), download the language, and then follow the steps as instructed to begin using the language.
-
click or touch Start.
Step 4: Setting up an Internet connection
Connecting to the Internet during the initial setup is optional, however if you choose not to set up a network connection, the computer is limited in functionality until you establish a connection. Without Internet, you cannot sign in using a Google Account, and cannot update software or download apps. The computer can be connected to the internet using a Wi-Fi connection or an Ethernet connection.
note:To skip past the Select Connection page, click or touch Skip, and then click or touch Skip anyway. Follow the on-screen instructions to continue setting up the computer.
To set up your Internet connection, choose one of the following sections depending on your Internet service.
Connecting to the Internet using Wi-Fi
If your wireless router requires that you enter a MAC address to connect, use a different Wi-Fi network, or skip connecting to Wi-Fi for the initial setup.
Use the following steps to connect to a Wi-Fi network during the initial setup process:
note:Some Wi-Fi networks (in hotel rooms, for example) feature an online sign-in page that requires you to access the Internet in order to sign in. When connecting to Wi-Fi for the first time (during the setup process), do not use a Wi-Fi network that features an online sign-in page.
-
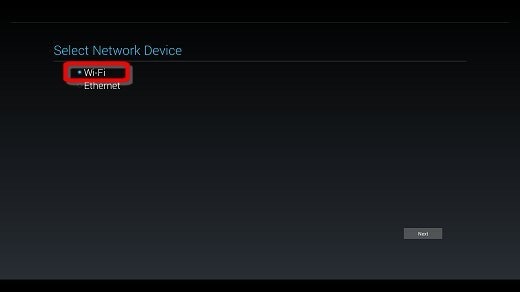
On the Select Network Device screen, click or touch Wi-Fi. Then click or touch Next
-
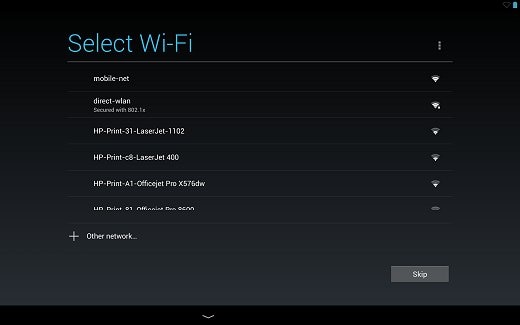
On the Select Wi-Fi screen, click or touch your Wi-Fi network in the list of available networks.
note:
If you are trying to connect to a hidden Wi-Fi network during the setup process, and the computer does not discover or connect to the network, temporarily unhide the network until setup is complete.
-
If a password is required, enter your password, and then click or touch Connect. Continue to the next step to set up an account.
Connecting to the Internet using Ethernet
Use an Ethernet connection if you want to connect the computer directly to a router in your home (instead of working wirelessly), or if you want to connect to an existing network at your office. Ethernet connection requires an 8-pin, RJ-45 network cable. Use the following steps to connect to the network using Ethernet:
-
Plug the network cable into the computer.
-
Ethernet connection

-
-
Plug the other end of the cable into the external network connector.
-
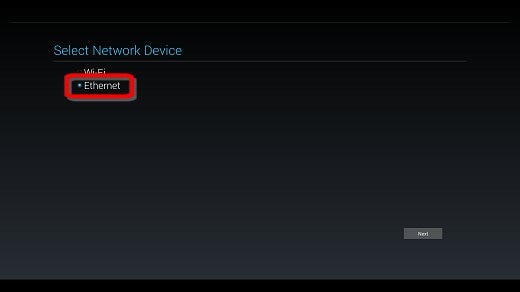
On the Select Network Device screen, click or touch Ethernet. Then click or touch Next
-
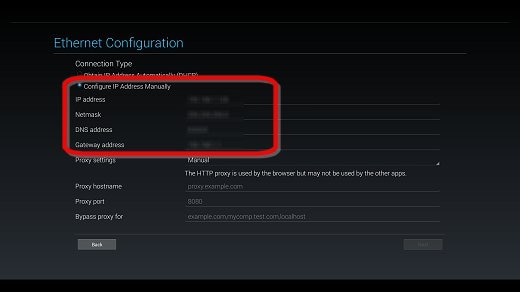
Input your IP address and your proxy settings, if required.
-
If you wish to automatically obtain your IP address, select Obtain IP Address Automatically, then click or touch Next.

-
You can manually enter your IP address information by selecting Configure IP Address Manually, then clicking or touching Next.
-
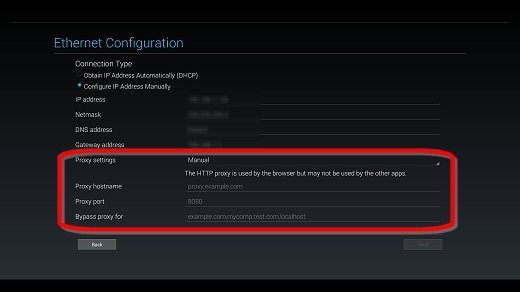
If your network requires proxy settings, manually enter the proxy hostname, proxy port, and any other required information in the provided fields.
note:
It may be necessary to request information or assistance from your workplace IT professional to complete this step.
-
Step 5: Setting up an account
When you sign in using your primary Google Account email address and password, you are automatically signed in to all the Google sites and services associated with that account (for example, Gmail and Google Play). The first account added to the computer is the owner account, and includes special permissions (for example, the ability to delete other user accounts stored on the computer, and the ability to reset the computer). After adding an account during the initial setup, up to seven (7) additional user accounts can be added to the computer.
Use the steps in one of the following sections to set up an account on your computer with an existing Google Account, with a new Google Account, or without using a Google Account:
Signing in with an existing Google Account
If you already have a Google Account that you want to use on your computer, use the following steps to sign in:
-
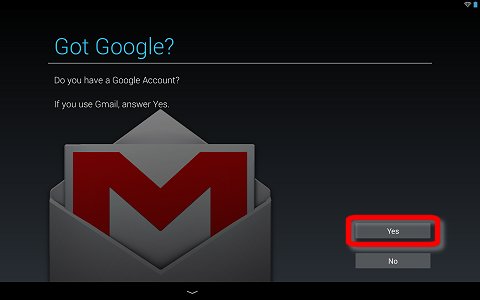
On the Got Google? screen, click or touch Yes.
-
On the Sign in screen, click or touch inside the Email field to display the on-screen keyboard for text entry. Enter your primary Google Account email address and password.
note:
By signing in, you are agreeing to multiple Terms of Service and Privacy Policies from Google. To read the full text of any of these agreements, click or touch the links on the Sign in screen.
-
The option to Keep me up to date with news and offers from Google Play is selected by default. If you do not want to receive emails about Google Play at your Gmail address, click or touch the check mark to remove the selection.
-
Click or touch OK to sign in.
Read and respond to any additional offers from Google.
-
Choose your backup preference, and then click or touch the forward arrow.
Signing in with a new Google Account
If you do not have a Google Account, or if you want to create a new account, use the following steps to sign in:
-
On the Got Google? screen, click or touch No.

-
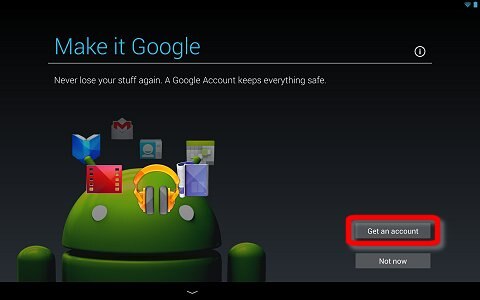
On the Make it Google screen, click or touch Get an account.
-
Enter your first and last name in the provided fields, and then click or touch the forward arrow.

-
On the Choose username screen, type your desired username. Your Google username is also your Gmail address. Click or touch the forward arrow when complete.

-
Wait while Google checks the availability of the username. If the username is not available, type a new username.
-
Create a password for your new Google Account. Re-type the password to confirm, and then click or touch the forward arrow.
-
Enter your recovery information, and then click or touch the forward arrow.
-
If you want to set up a Google+ profile, click or touch Join Google+, and follow the on-screen instructions. You can join Google+ at any time after creating the account. To skip this step, click or touch Not now.
-
On the Finish account screen, choose your account preferences, and read the service, privacy, and policy notices provided by Google. Click or touch the forward arrow to progress to the next screen.
-
Authenticate your account by typing the text you see on the screen. When finished, click or touch the forward arrow.
-
Read and respond to any additional offers from Google.
-
Choose your backup preference, and then click or touch the forward arrow.
Signing in without a Google Account
A Google Account is critical for getting the most out of your computer. Without a Google Account, the computer is limited in functionality; you cannot use most Google apps or download new apps from the Google Play Store without a Google Account. If you are not ready to add a Google Account during the setup process, use the following steps to set up your computer without adding a Google Account:
-
On the Got Google? screen, click or touch No.
-
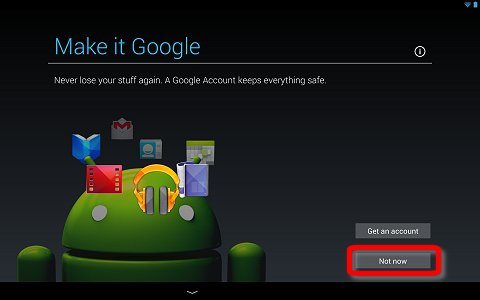
On the Make it Google screen, click or touch Not now.
Step 5: Completing setup
Select your location preferences, and the date and time in order to complete the computer setup. These settings can be changed at any time by accessing the settings.
-
Select your Google & location preferences, and then click or touch the forward arrow.
-
To select your time zone, click or touch GMT and then select your time zone from the list.

-
Click or touch Current date to set the date.

-
Click or touch Current time to set the clock. Click or touch the forward arrow to take you to the next screen.

-
Enter your first and last name in the provided fields, and then click or touch the forward arrow.
-
Read the terms on the Google services screen. Click or touch the forward arrow to agree with the terms.
Step 7: Registering your product
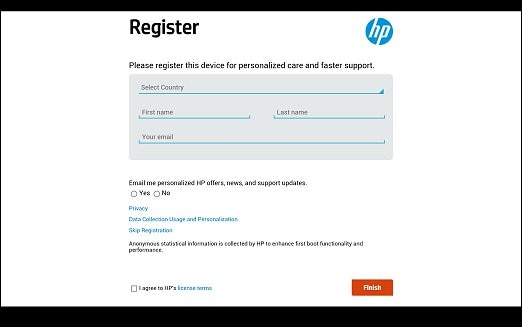
When you reach the Setup complete screen, click or touch Finish. A product registration page appears. Follow the on-screen instructions to register your computer, or bypass the registration by clicking or touching Skip Registration. If prompted, read and agree to HP's license terms.
The computer is set up and ready to use.
Step 8 (optional): Connecting the keyboard and mouse
If you plan to use a keyboard and mouse with your computer, connect them now. Connect the optional wired keyboard and mouse to the USB ports in the Rear I/O compartment.
Source: https://support.hp.com/id-en/document/c03913549
0 Response to "How to Start Hp All in One Pc"
Post a Comment