Upload Either Doc
This browser is no longer supported.
Upgrade to Microsoft Edge to take advantage of the latest features, security updates, and technical support.
Add files to the server
Azure DevOps Services | Azure DevOps Server 2020 | Azure DevOps Server 2019 | TFS 2018
Visual Studio 2019 | Visual Studio 2017 | Visual Studio 2015 | Visual Studio 2013
Adding a file to version command is frequently automatic when you use Solution Explorer and your project is under version control. Even so, in some cases, you lot have to take some extra steps to add together the projection to version command.
Create a new code projection and solution under version control
Yous can simultaneously create a new projection and add it to version control so that yous and your team tin can immediately enjoy all the benefits of version control first from the first line of code y'all write.
-
In Visual Studio, if you have not already done and then, connect to the projection.
-
Choose File, New, Projection (Keyboard: Ctrl + Shift + N).
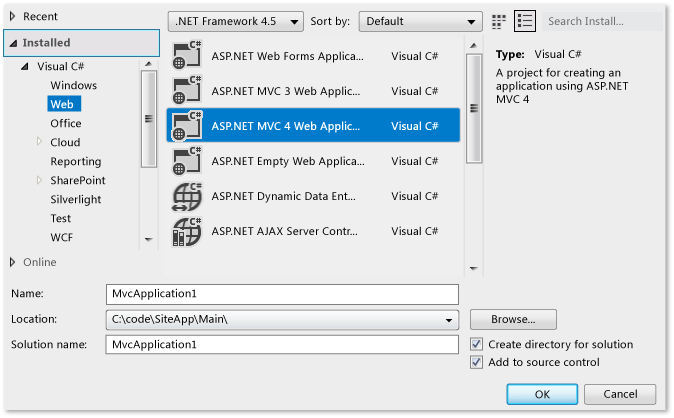
The New Project dialog box appears.
-
Select the blazon of lawmaking project that you desire to create.
-
In the Proper name box, specify the name of the lawmaking project.
-
If the Solution list appears, make sure Create new solution is selected.
-
In the Location list, specify the path to a good local working folder (such as c:\lawmaking\SiteApp\Chief\) in the workspace you created when you set up your dev machine.
Make sure the Create directory for solution and Add to source command check boxes are selected.
-
Choose OK to create the lawmaking project, which you can and then view in Solution Explorer (Keyboard: Ctrl + Alt + L).

-
In Solution Explorer, open the context menu of the solution you created or modified and then cull Check In to submit your pending changes.
Identify an existing solution and lawmaking projects under version control
To add together an existing solution to version control, motility all the solution files into your workspace, and and so add them.
Note
Avoid using the Add Solution to Source Control dialog box to upload your solution into version control. Use the post-obit procedure instead.
-
In Visual Studio, if you have not already done and then, connect to the project.
-
Cull View, Other Windows, Source Control Explorer.
-
In Source Control Explorer, navigate to a logical parent binder for your solution, such equally $/SiteApp/Main, where SiteApp is the proper name of your project. Why is this a good parent folder?
-
Choose the link next to Local Path to open the parent folder in Windows Explorer (File Explorer in Windows viii).
What do I practice if the link text is "Not Mapped"?
-
Move the folder that contains your solution into the parent binder.
-
In Visual Studio, choose File, Open, Project/Solution, and then use the Open Project dialog box to open up the solution.
-
In Solution Explorer (Keyboard: Ctrl + Alt + L), select the solution, open its context carte du jour, and and then choose Add together Solution to Source Control.
-
In Solution Explorer, select the solution, open its context bill of fare, so choose Check In.
-
In Team Explorer, the Pending Changes page appears.
-
Are there whatever Detected items shown in the Excluded Changes section?
-
No: Skip to the next pace.
-
Yeah: Choose the Detected link. The Promote Candidate Changes dialog box appears. The files in listed in this dialog box are not referenced by any code projects in your solution. If your squad volition demand these files, make sure they are selected so choose Promote to move them into the Included Changes section of the Pending Changes page. For more than information, see Check in your work to the team's codebase.
-
-
When yous're ready, submit your pending changes.
Add i or more than files to version command
When you use Solution Explorer to add a file to your lawmaking project, the system automatically adds it to version control. Notwithstanding, y'all can also add files that are not referenced by your lawmaking projects.
Tip
If you are creating an automated procedure or prefer to use the command prompt, you can use Add control instead of the following procedures.
Automatically add one or more files to version command
Of import
These steps simply apply when using a local workspace. Files saved when working in a server workspace will add and cheque in without showing as a pending change in Team Explorer.
If yous are using a local workspace, so new files are automatically detected past the Pending Changes page.
-
In Visual Studio, if you have not already done and then, connect to the projection.
-
Choose View, Other Windows, Source Command Explorer.
-
In Source Control Explorer, navigate to the folder where y'all want to add the files or folders.
-
Choose the link adjacent to Local Path to open the target binder in Windows Explorer (File Explorer in Windows viii).
Move your files and folders into this folder.
What do I do if the link text is "Not Mapped"?
-
In Visual Studio, in Team Explorer, choose Pending Changes.
-
On the Pending Changes page, in the Excluded Changes section, select the Detected link.
-
In the Promote Candidate Changes dialog box, brand sure simply files that you desire to check in are selected, and then choose Promote.
-
Submit your pending changes.
Manually add files to version command
You can also manually add files to version control.
-
Cull View, Other Windows, Source Command Explorer.
-
In Source Control Explorer, navigate to the folder where you lot want to identify your files.
Of import
Make sure this folder is checked in before yous keep. If you are creating the folder now, open its context carte du jour and choose Check In, and and so bank check in the new folder earlier proceeding.
-
Elevate the folders or files from Windows Explorer (or File Explorer) into the folder in Source Control Explorer.
-
When the Add together to Source Command dialog box appears, make sure all the files y'all want to add together are selected, and then choose Include particular(due south).
-
Choose Finish.
-
In Team Explorer, when the Pending Changes page appears, make sure the binaries that you lot want to add appear in the Included Changes department. Cull Check In.
Leverage third-political party binaries that your code does not build
Many teams develop code that depends on binaries that are not built by the solution in which they manage their code. Typically these binaries are role of a library that the team has licensed from a 3rd political party.
Sometimes these binaries come from another team in the same visitor. For instance, Team A depends on binaries produced by Squad B, and each team must for some reason work in dissimilar project collections. As a outcome, Team B delivers binaries to Squad A, which then checks them into version control.
Tip
If your dev machines and build agents can access the Internet, then NuGet may make it easier for your team to manage your dependencies and go on your binaries upwardly to date. Yous can shop your packages in TFS or Azure DevOps Services using Azure Artifacts.
The folder and workspace construction you should use to store your third-party binaries depends on the fashion your solutions depend on these libraries.
Add together the binaries inside your folder or branch construction
If you identify your third-political party binaries in the same parent folder that contains your solution folders, then all your code projects in all solutions can reference the libraries with the same relative path.
For case, a squad uses this folder structure:
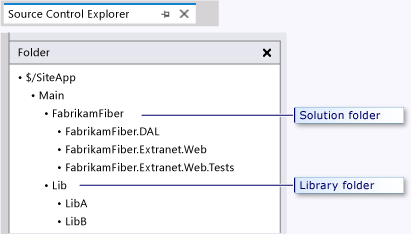
Every code project can and so reference the libraries folder with the post-obit relative path: ../../Lib
If, subsequently in your project, your team needs to isolate separate efforts that require dissimilar versions of the binaries, you tin branch the library folder along with your solution folder.
For example, Version 1 an app leverages Version 1 of a library. Every bit some developers on the Data Access team work on the next version, they leverage Version 2. But the other teams are not withal ready to upgrade. You lot can utilise branches to manage this kind of state of affairs.

Use a workspace to map in the binaries
Some companies must manage more complicated dependencies on third-political party libraries. For case, multiple projects contain solutions with different dependencies on a mutual fix of libraries. In cases similar this, you can store your third-political party libraries in a dedicated project. Contributors to the various projects map in the folders that contain the libraries they need.
For example, FabrikamFiber puts the post-obit project, co-operative, and folder structure in place:
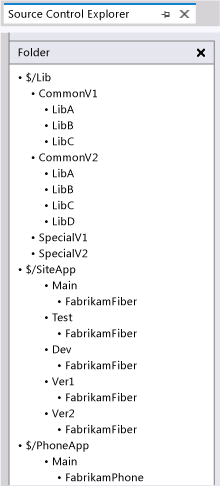
Raisa sets upwards her dev motorcar with two workspaces for two different efforts, each of which map in the libraries she needs:

Customize which files are ignored by version control
By default sure types of files (for case, .dll files) are ignored past version control. Every bit a result:
-
When yous add ignored files to folders that are mapped in a local workspace, they practise not appear in the Pending Changes page in Team Explorer.
-
When you try to add together ignored files using the Add to Source Command dialog box (for example by dragging them into Source Control Explorer), they automatically appear in the Excluded items tab.
Yous tin can configure which kinds of files are ignored past placing the .tfignore text file in the folder where y'all want rules to apply. The effects of the .tfignore file are recursive. Still, you can create .tfignore files in sub-folders to override the effects of a .tfignore file in a parent folder.
.tfignore file rules
The following rules apply to a .tfignore file:
-
#begins a annotate line -
The
*and?wildcards are supported. -
A filespec is recursive unless prefixed by the
\character. -
!negates a filespec (files that match the pattern are not ignored)
.tfignore file example
###################################### # Ignore .cpp files in the ProjA sub-folder and all its subfolders ProjA\*.cpp # # Ignore .txt files in this binder \*.txt # # Ignore .xml files in this binder and all its sub-folders *.xml # # Ignore all files in the Temp sub-folder \Temp # # Do not ignore .dll files in this binder nor in any of its sub-folders !*.dll Create and employ a .tfignore file
While yous can manually create a .tfignore text file using the higher up rules, y'all can also automatically generate one when the Pending Changes page has detected a alter.
Of import
This only applies when using a local workspace. Files inverse when working in a server workspace volition check in without showing as a pending modify in Squad Explorer.
To automatically generate a .tfignore file
-
In the Pending Changes page, in the Excluded Changes department, select the Detected link.
The Promote Candidate Changes dialog box appears.
-
Select a file, open its context menu, and choose Ignore this local item, Ignore by extension, Ignore past file proper name, or Ignore by binder.
-
Choose OK or Cancel to shut the Promote Candidate Changes dialog box.
-
A .tfignore file appears in the Included Changes section of the Pending Changes page. You can open this file and alter information technology to see your needs.
The .tfignore file is automatically added as an included pending change so that the rules yous have created will apply to each team member who gets the file.
Work from the command prompt
- Add command Upload files from the workspace on your dev machine to your server.
Related articles
- Determine between using a local or a server workspace
Feedback
Submit and view feedback for
Source: https://docs.microsoft.com/en-us/azure/devops/repos/tfvc/add-files-server
0 Response to "Upload Either Doc"
Post a Comment